Cabinet Painting Sacramento is a low-cost option for giving kitchen or bathroom cabinets a fresh look without replacing them. It is best to hire a professional for this project.
Unlike wall paint, cabinet paints contain more resins to make them more durable against moisture and scuffs. They also come in different finishes including matte, satin and semi-gloss to suit your style preferences.
Whether you’re painting your cabinets to give them a fresh look or simply to change the color, sanding is a key step in the process. It removes the sheen, dulls the surface and helps to create a good bond with primer and paint. If you skip this step, your new finish won’t stick and could start peeling within a few months. This guide will show you exactly how to sand your cabinets and which sandpaper grits to use to ensure a smooth, beautiful result.
Most DIYers and professional painters skip this step, but sanding is absolutely essential for a smooth, long-lasting finish. Not only does it help your cabinet paint adhere to the surface, but it also reveals any imperfections or blemishes you might want to address before applying your final coat. It’s an easy step to neglect, but one that can dramatically improve the quality of your finish.
Before beginning the sanding process, you’ll need to make sure that all surfaces are clean and free of oil and grease. This will prevent any future problems with your paint or stain job. You can use a degreaser or liquid deglosser to remove these contaminants from your surfaces. Be sure to follow the manufacturer’s instructions carefully. Depending on the amount of dirt that your cabinets have, you may need to sand more than once.
When you’re ready to begin sanding, be sure to wear a dust mask and safety goggles to protect yourself from the airborne particles. You should also place a drop cloth or plastic sheet over your workspace to catch any dust that falls off the work surface. You should also label the doors and hardware you’re removing to help you keep track of them as you work.
For large flat areas, an electric random orbital sander is a great choice, while a detail sander or wrapped sandpaper is ideal for tight spaces and edges. If you’re working with an old finish, a coarse grit of sandpaper will provide a quicker and more effective removal than a fine grit. Once you’re finished sanding, wipe all surfaces with a tack cloth to get rid of any remaining particles and prepare them for priming.
Primer
When it comes to painting cabinets, primer is the unsung hero that paves the way for a flawless finish. It’s easy to skip this step, but it’s important to take the time and effort required to ensure a beautiful result that will stand the test of time.
The right primer can help you save time and money by reducing the number of coats of paint you need to apply. It also helps to ensure that the topcoat adheres properly and stays looking smooth. With so many different products on the market, it’s important to find a primer that is suitable for your project. For example, an oil-based primer is ideal for wood surfaces, while a water-based primer works well on drywall.
Before you apply your primer, it’s important to make sure that your cabinet surfaces are clean and dry. Wash them with a degreaser to cut through any grease buildup and leave a clean surface for the primer to bond with. Once your primer is dry, you can start to paint.
It’s also a good idea to lightly scuff sand the cabinet surfaces after priming. This will help to remove any sheen and ensure that the paint sticks properly. Be sure to use a fine grit, such as 220-grit, and then wipe away any dust with a damp cloth.
Once you’ve applied your primer, allow it to dry for 24 hours before continuing with the rest of your project. During this time, be sure to cover any areas that you don’t want to get paint on with plastic coverings or drop cloths. It’s also a good idea to inspect your work periodically to catch any dust particles before they can cause problems.
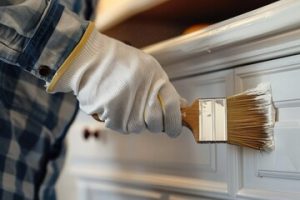
Once your primer is fully dried, you can begin to paint the cabinet doors and frames. For a smooth, even finish, it’s best to use a foam brush or a roller. If you’re using a roller, be careful not to overload it with primer – this can lead to drips and streaks. Work in small sections at a time, and be sure to overlap each area.
Paint
Cabinet painting can give your kitchen a dramatic facelift at a much lower cost than replacing cabinets. This makes it a great option for those who are not ready to do an entire kitchen remodel or simply want to update their home without the expense of buying new cabinets. However, it is not without its challenges. Whether you are a DIYer or a homeowner looking to hire a professional, it is important to understand how to prepare for the job and what to expect once the work begins. This will help you decide if it is a project that should be tackled on your own or if you should call in the pros.
It is important to remember that cabinet paint needs to be applied over a degreased surface. Grease can cause the paint to chip and scuff off. This is a common problem that can be avoided by thoroughly cleaning the surfaces to be painted before sanding. The use of a degreaser such as Krud Kutter or TSP is recommended to ensure that all grease, dust, and gunk are removed from the surface.
While some homeowners skip this step, it is critical to properly prepare the surface for painting. Loose or chipping paint is almost always a result of inadequate surface preparation. To avoid this, a good quality primer should be used. Primer is also helpful in ensuring that the final coat of paint will adhere properly to the surface.
Most professionals will apply two coats of primer and then one coat of paint, totaling three coats. This will give you the best results. However, it is important to remember that different types of paint will require a variety of coats. Some may need as few as two coats while others may need a third or even more.
Once the cabinets are fully painted, it is a good idea to let them dry completely before reattaching the doors and hardware. This will prevent drips and give them time to fully cure to a hard, durable finish. This is especially important in high-use areas like kitchen cabinets.
Finish
Cabinet painting is a big job, and it takes time to do well. It is important to not cut corners or skip steps. This can lead to a poor paint job that will be noticeable and may require touch-ups in the future. Hiring professionals who have experience with cabinet refacing or painting can help ensure the job is done correctly and efficiently. Professionals also have access to specialized tools that can save them time, which can help lower the cost of the project.
Another advantage of hiring a professional is that they will have experience working with wood and other materials. They know the best techniques to achieve a high-quality finish that will look great for years. They will also have knowledge of color and sheen options, including satin, eggshell, and gloss. This will help them select the perfect finish for your cabinets and ensure they stand out from the rest of your kitchen.
Lastly, they will have the proper equipment and supplies to complete the job. This can include a high-quality brush, roller, and spray gun. They will also use a degreaser to remove any grease or dirt from the surface of the cabinet before painting. This is important to ensure that the new paint will adhere properly and will last for years to come.
After the new cabinet paint is applied, it should be allowed to dry completely before replacing the hardware. This can take several days, depending on the weather. Once the cabinets are fully dry, it is a good idea to wipe down the surfaces with a damp cloth to remove any dust particles that may have formed on the surface.
A fresh coat of paint on your cabinets can make a huge difference in the look and feel of your kitchen. It can also increase the value of your home, making it more attractive to potential buyers if you ever decide to sell. Choosing the right sheen and finish will help you choose the right look for your space and will ensure that the finished product will stand up to daily wear and tear.